
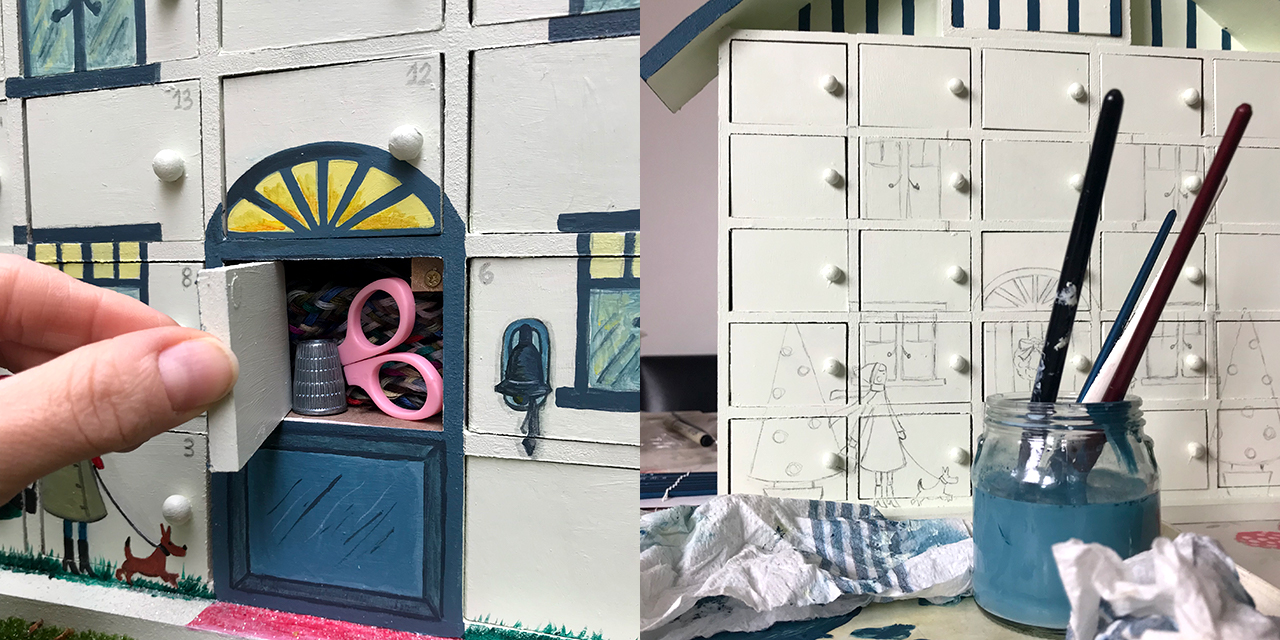
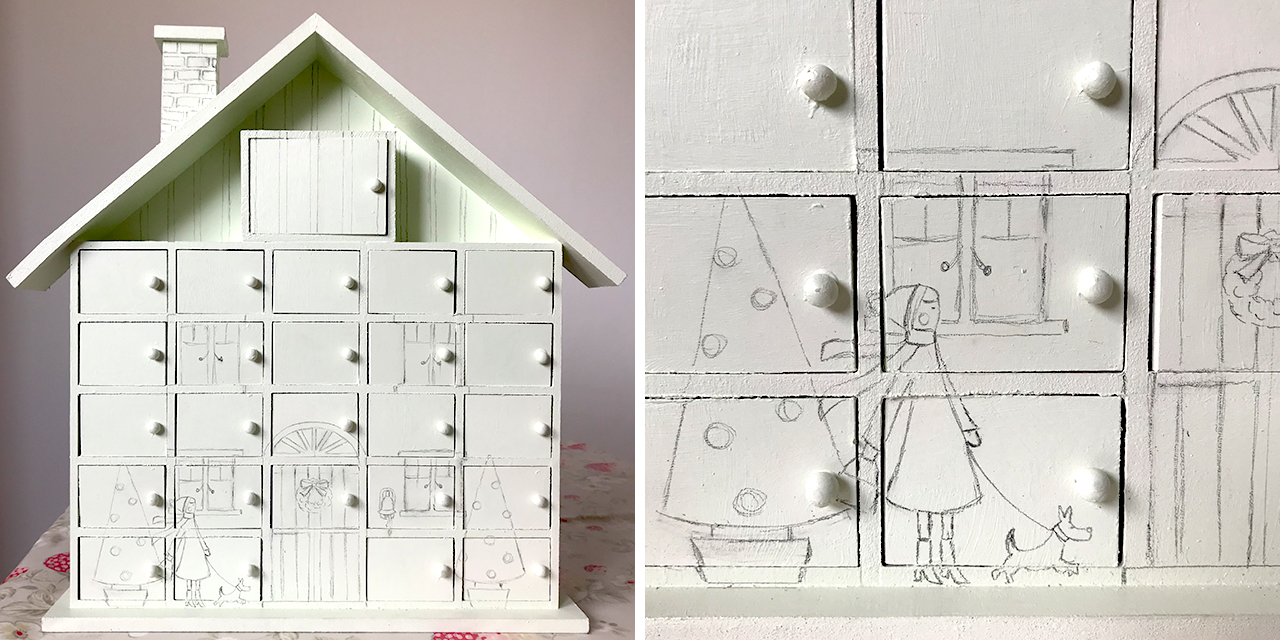
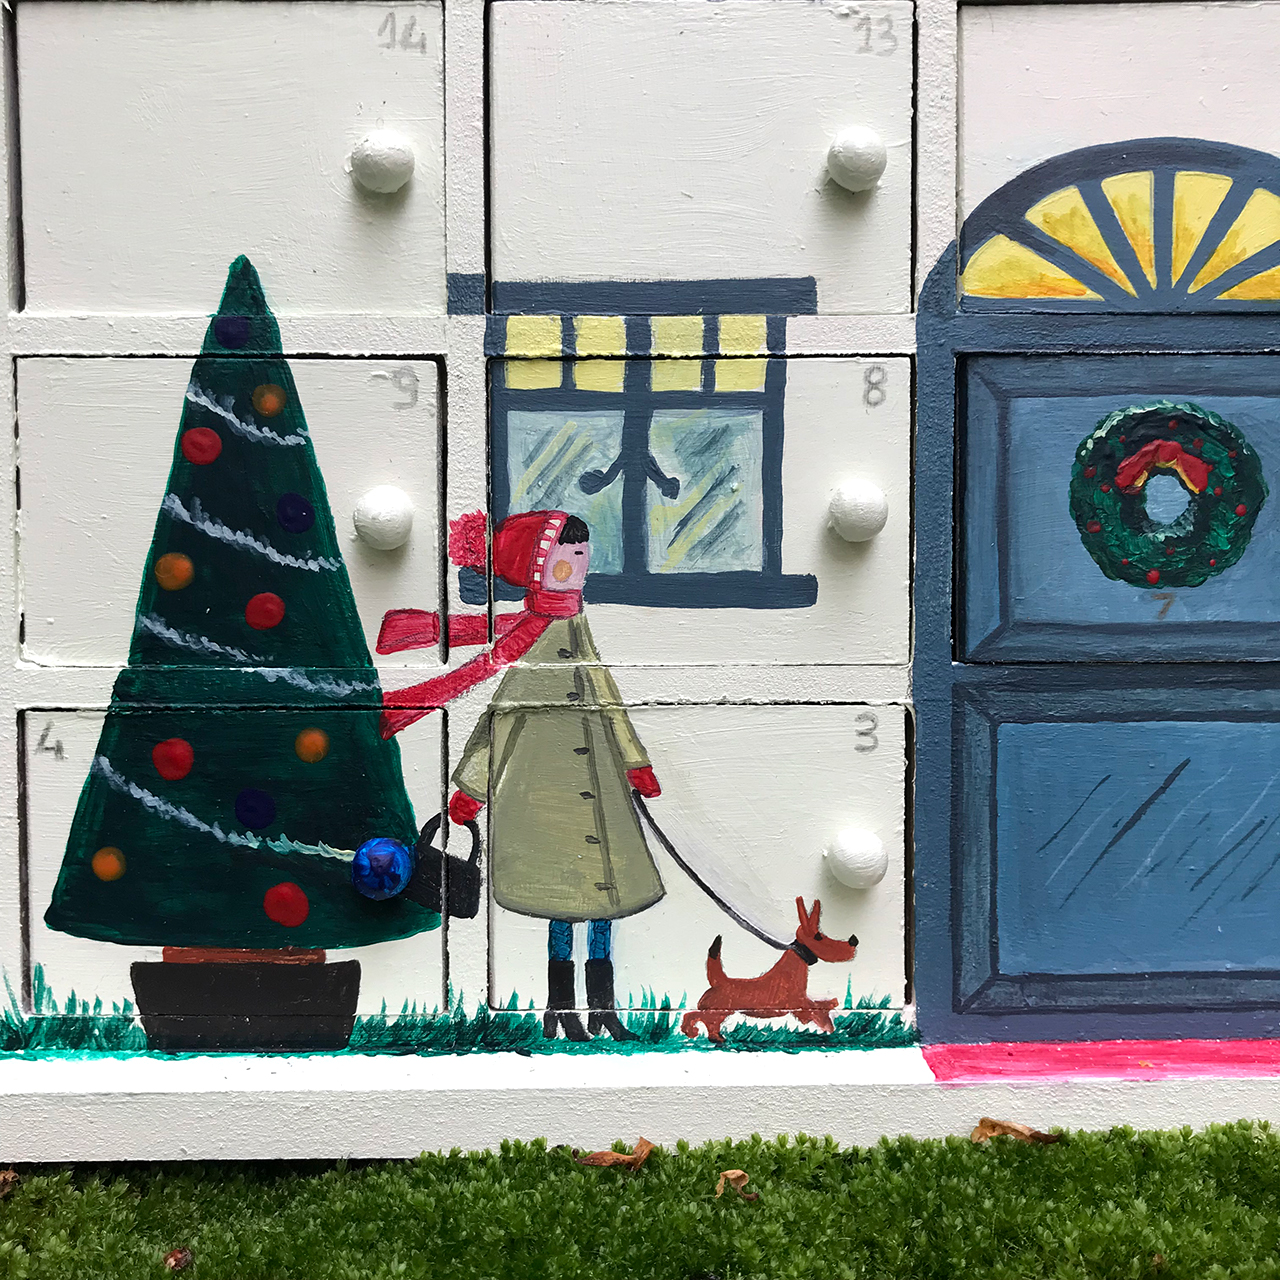
There are so many fabulous and inspiring handmade Christmas projects online, but it is Hobbycraft that will make you want to buy all of their products and get crafting straight away!! The first time I stumbled upon on their website, I was blown away by the variety of products and craft materials that you can choose from. This year, I could not resist the wooden house advent calendar and wanted to create my own unique version! Before starting, let’s look at what an advent calendar is. ‘Advent’ in Latin means ‘coming’, and is the period between 1st December and 25th December. It is a countdown calendar with each day offering a little present to discover until Christmas day. With my decoration, inspiration came from British architecture – a little fantasy mix of the Tudor, Regency and Victorian periods. By combining these styles I came up with my dream house – light mint with a blue roof and a red brick chimney. You can see me coming back after shopping with my dog and woolly hat.
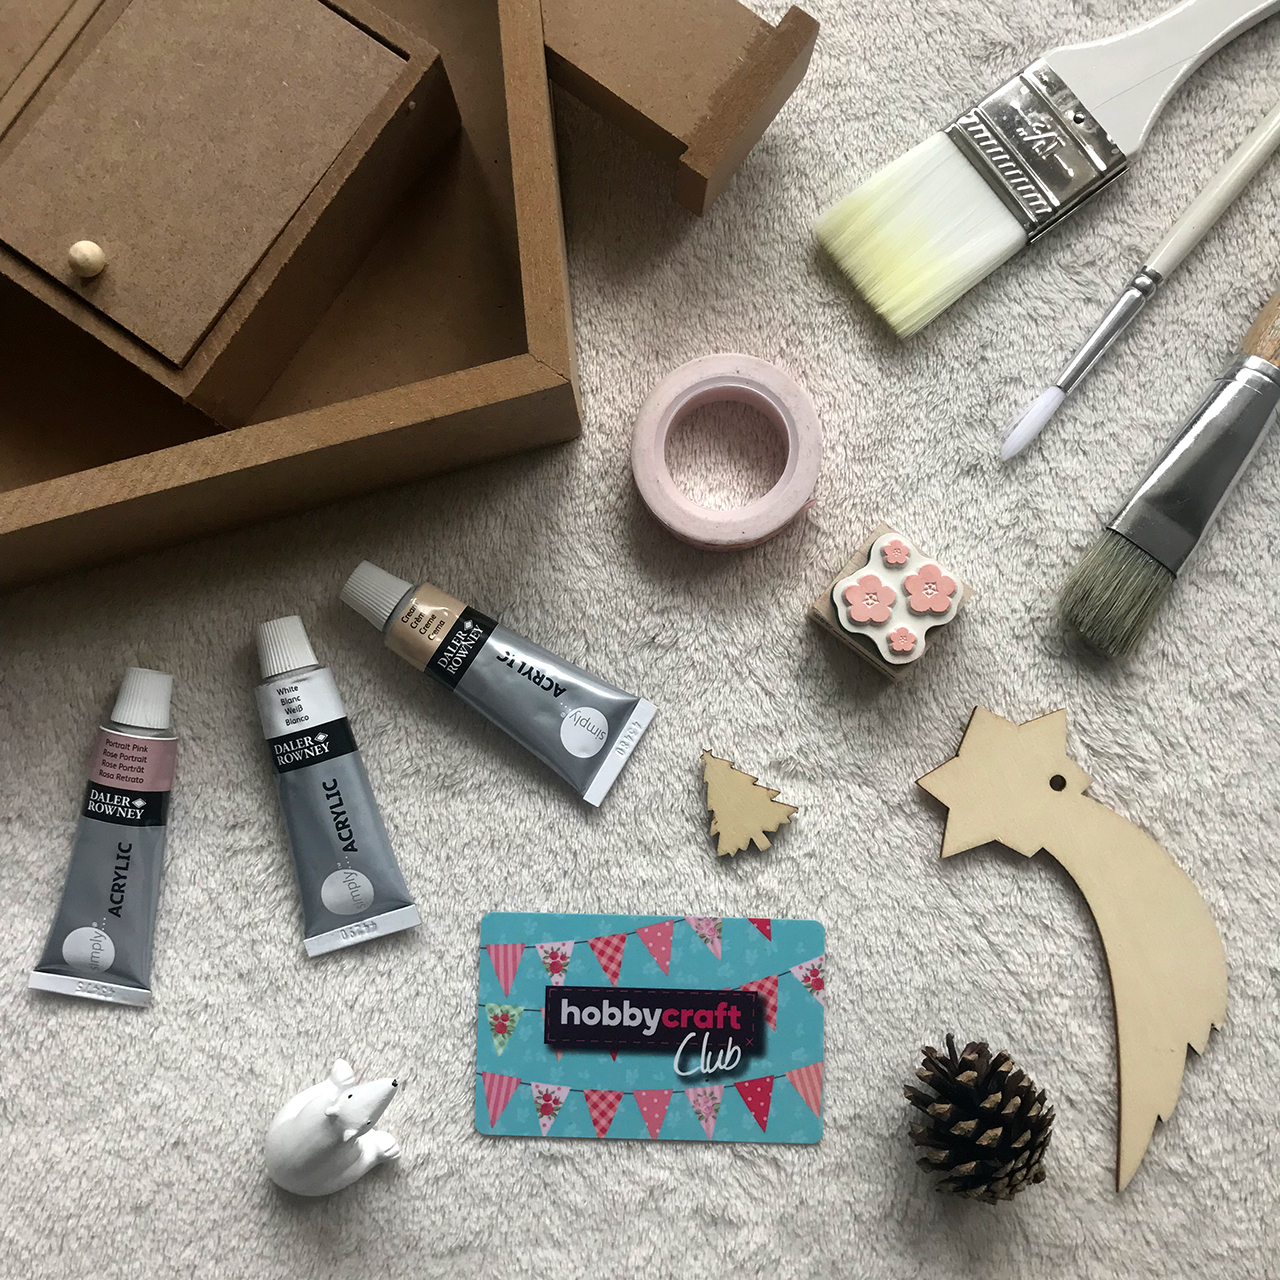
Get all the following materials ready and enjoy my tutorial below…
• Wooden house advent calendar from Hobbycraft
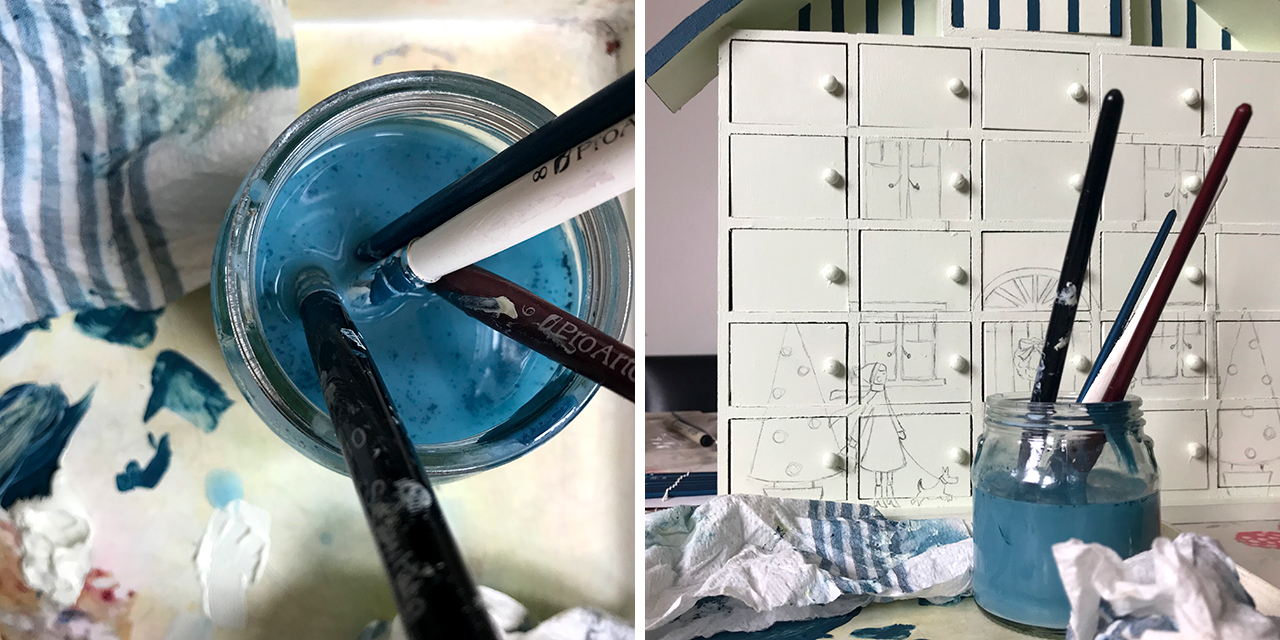
• Artist’s 14 piece loft mixed media brush set from Hobbycraft
• Daler Rowney acrylic paints from Hobbycraft
• Palette and pot
• Pencil and paper
• Silver metallic colouring pencil (Derwent)
• 25 mini-gift ideas
Method
- Order the wooden house advent calendar from Hobbycraft. Find inspiration on Pinterest, in magazines, postcards or simply looking around your own town or city – choose your style and colour theme. British architecture inspired my advent house.
2. Draw the house and details on paper so you have a clear idea about the final look and a guide to refer to.
3. Choose the acrylic colours that fit the theme of your house. Mix the acrylics carefully on a palette before applying. You will need a big brush to paint the base with two coats (or you could use spray paint for an even finish). I created a light mint pastel colour by mixing white with a touch of dark green and then adding very small amounts of dark blue and deep yellow to get the mint effect.
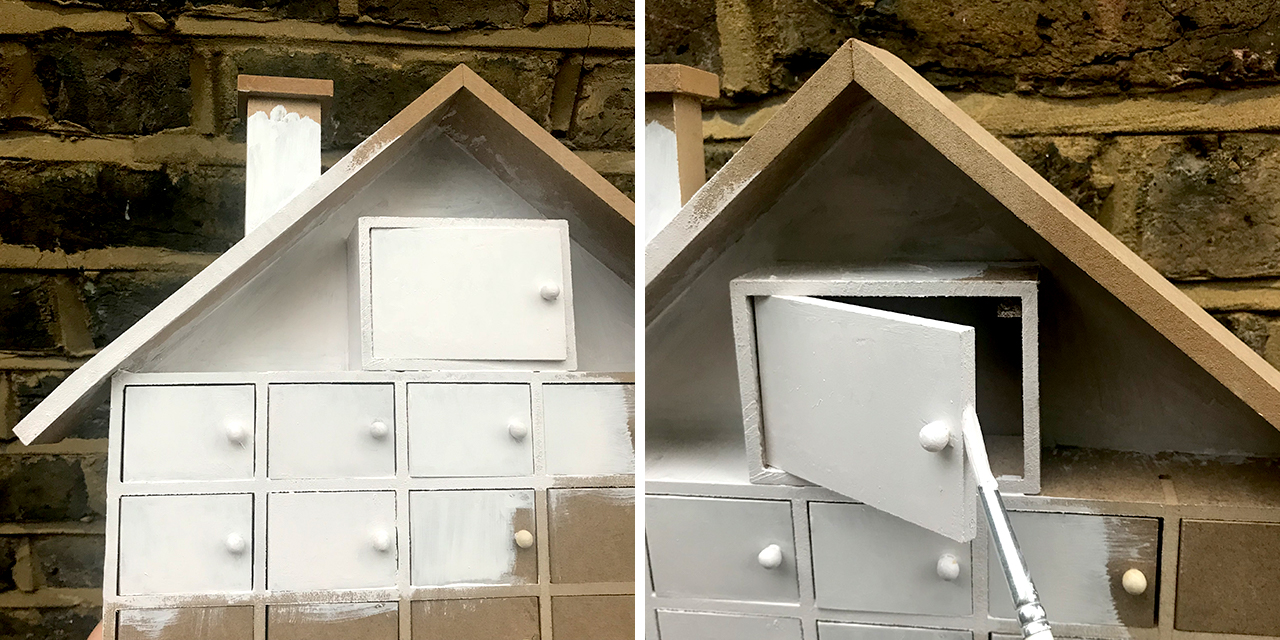
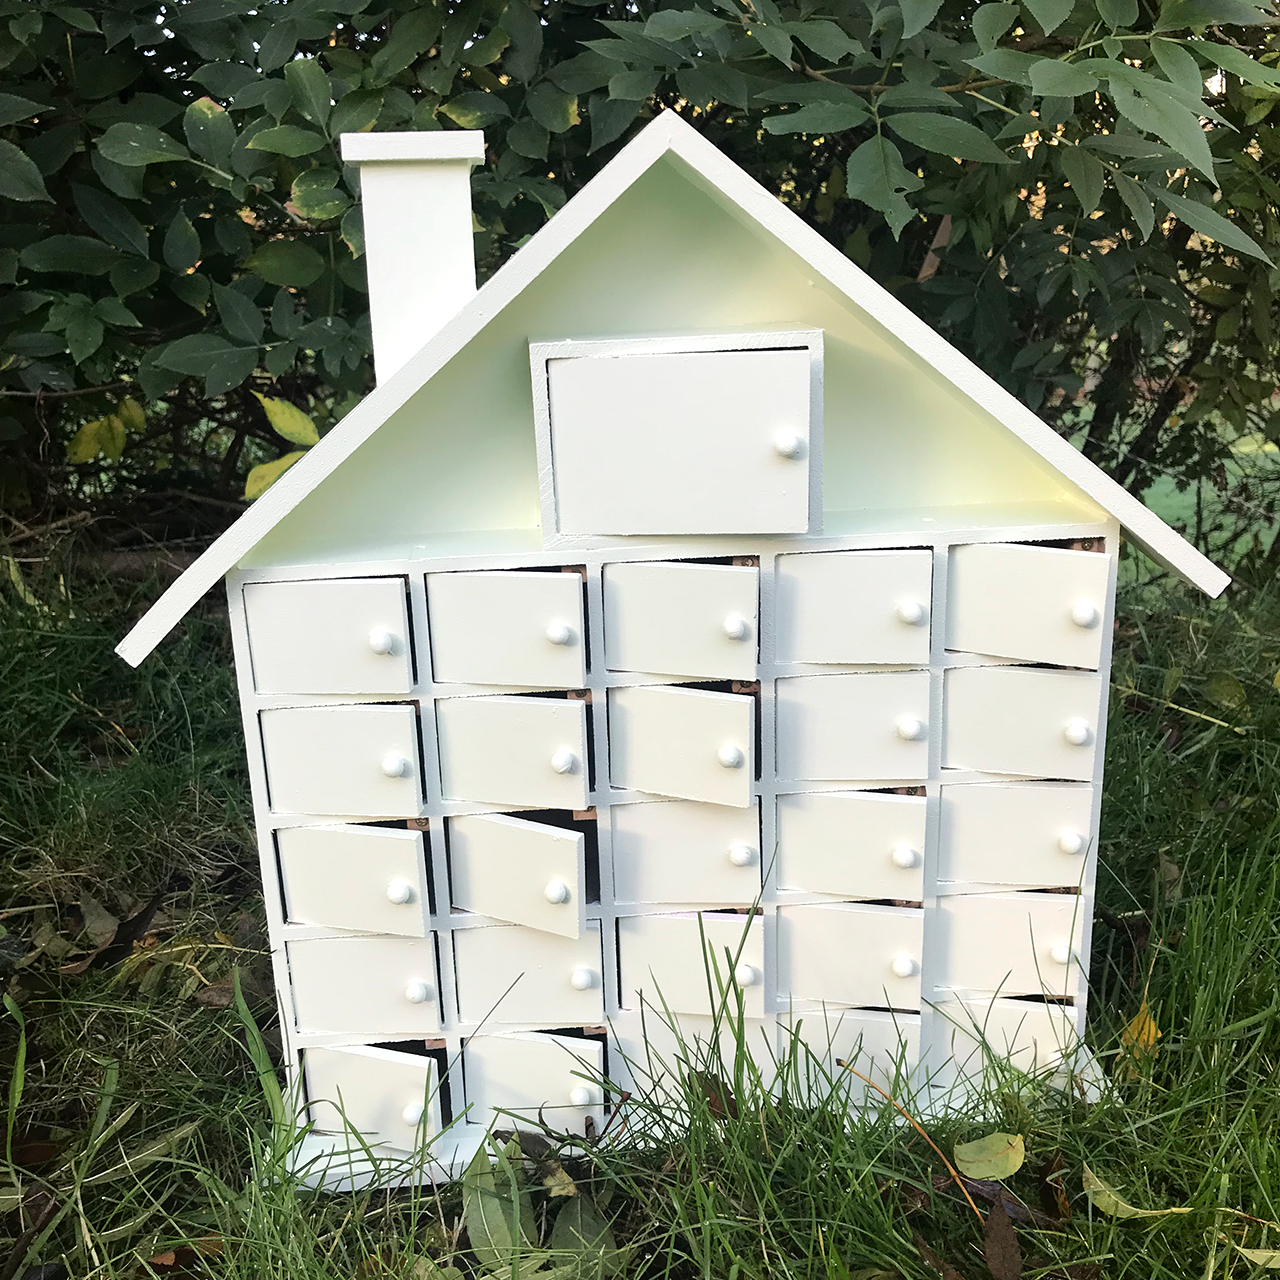
4. The two coats will create a base for your house. Once dried (approximately 10 minutes) you will be able use the guide that you created earlier to draw the details directly on the house with pencil.
5. Following your pencil drawing, paint the details with acrylics using brushes of different sizes depending on your drawing. For the roof, windows and doors I used different mixtures of blue and different sized brushed. For the Christmas tree, I used the no.3 brush and for the woman with the dog, I used the no.1 brush. Let all the acrylic paints dry for about 10 minutes after applying.
6. While the paint is drying, you can prepare the 25 mini-gifts by deciding which one will go in each ‘window’.
7. You can write the countdown numbers 1 to 25 on each ‘window’ with a silver metallic colouring pencil.
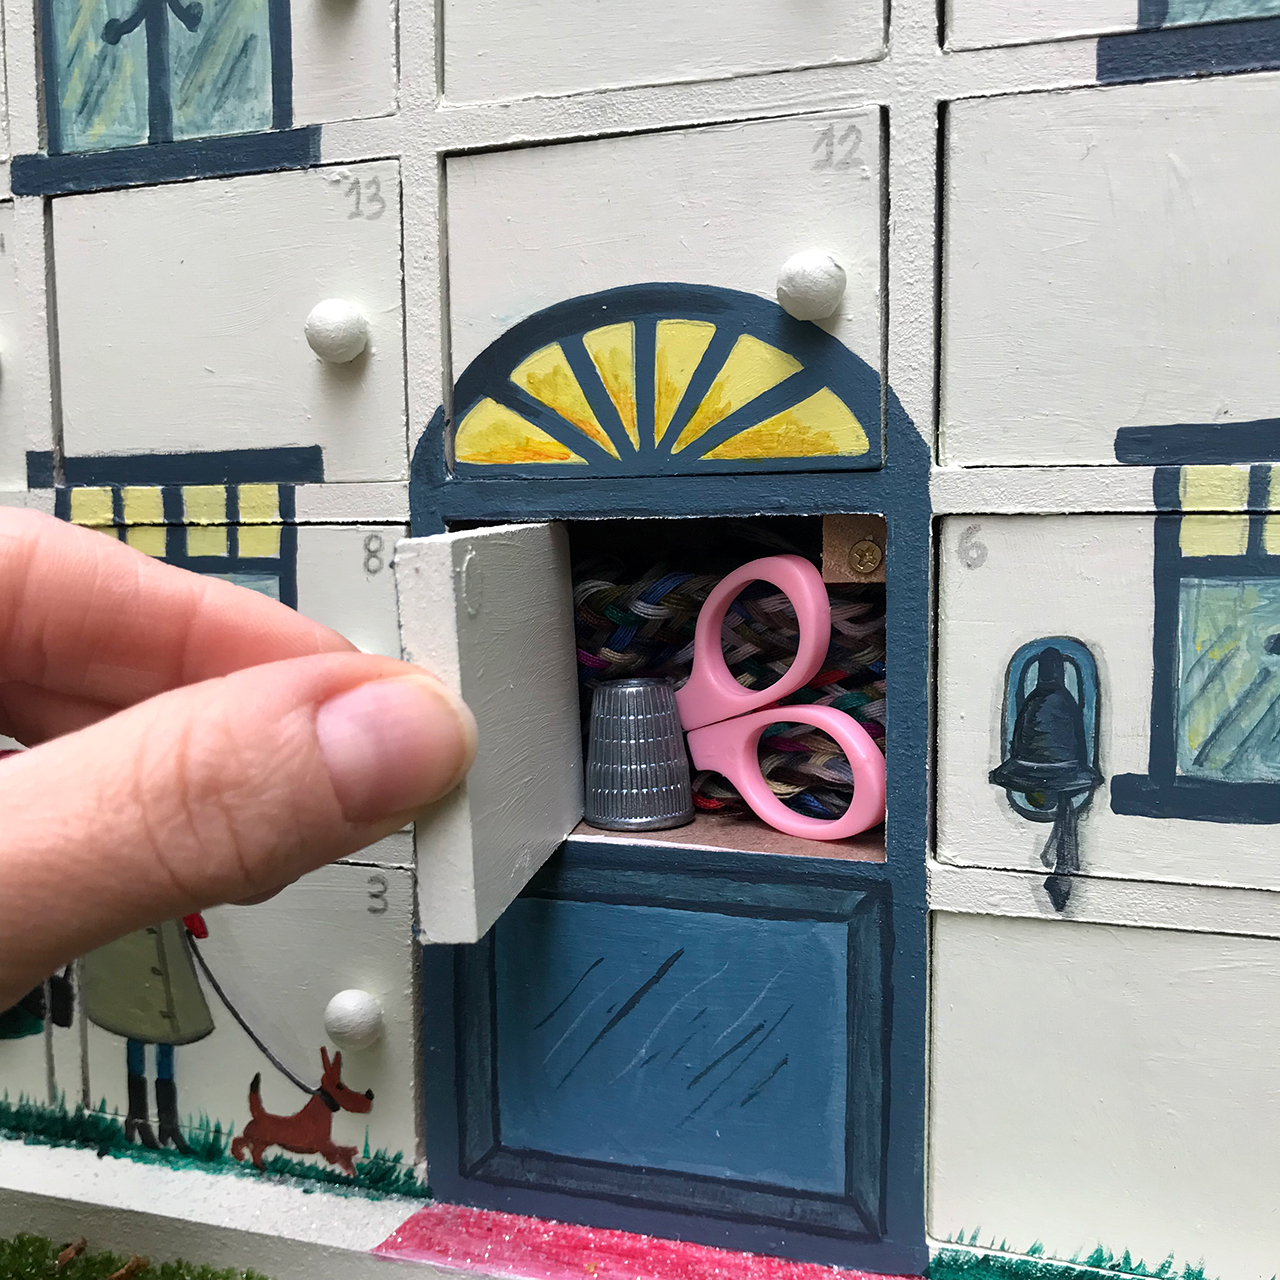
8. Now you are at the final stage – you are ready to position your gifts inside!
I decided to swap the traditional chocolate treats for inspiring and creative gifts. I included handmade projects to be discovered – a daily creative treat for the creative mind. Here are my 25 carefully chosen advent calendar mini-gifts (going right to left, from bottom right) –
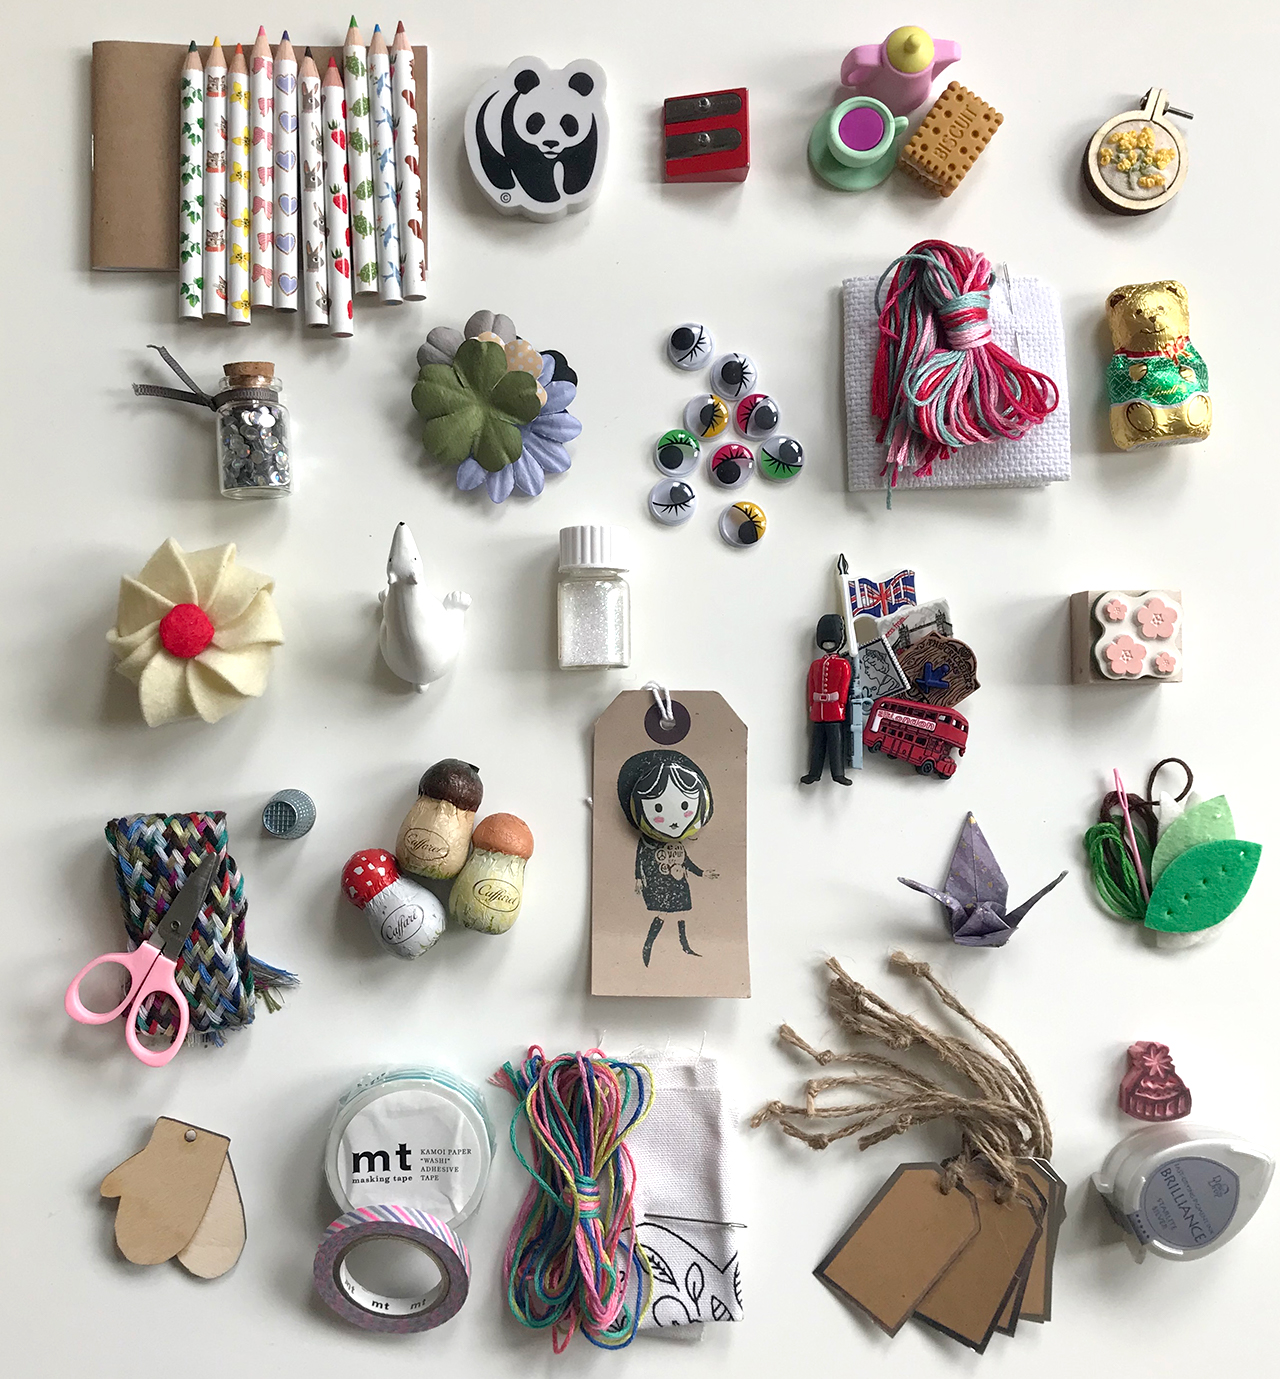
- Ink pad (Hobbycraft) with rubber woolly hat stamp (Zest & Lavender)
- Mini gift tags (Paperchase)
- Scandi Florals Kit printed (Zeena Shah from Molly Makes)
- MT washi-tape (Mywashitape)
- Wooden mittens laser cut (Zest & Lavender – ready to be painted!)
- Felt leaves kit (Tiger)
- Origami swan (Olivera Ishtar)
- Face badge (Love Bessie)
- Mushroom chocolates (Caffarel)
- Sewing Kit (Loop)
- Japanese flowers stamp (Japanese Stationery at Loft)
- Destination England creative buttons (Dress it up)
- Mini glitter bottle (Hobbycraft)
- Polar bear decoration (Hobbycraft)
- Felt biscuit (Zest & Lavender)
- Chocolate bear (Lindt)
- Cross stitch sewing kit (Mollie Makes)
- Painted wiggle eyes pack (Hobbycraft)
- Paper Blossom (Hobbycraft)
- Confetti bottle topper (Paperchase)
- Embroidered hoop pendant (Shaulalala)
- Tea-time erasers (WHSmith)
- Red Sharpener (WHSmith)
- WWF panda rubber (World Wide Fund for Nature)
- Mini colouring pencils (Elodie Nouhen by Djeco) and mini notepad (Danillabag)
This time, Christmas can be about creative inspiration! Keeping your kids, friends and loved ones inspired during the holidays with an advent calendar filled with surprises and projects to do.


Joyce Byrne
26th November 2022You have given me so much inspiration to start on my Hobbycraft project. I’ve been sitting staring at mine for 3 weeks now dithering how to paint it. I have looked at Pin interest for ideas but yours outshines all of them. I love the way you have incorporated personal facts (taking the dog out for his walk) – genius ! Just going to get on with mine today and add some personal touches to mine. Thank you so much for posting – it’s amazing !!
ilaria
25th November 2024Hi Joyce, I was wondering if you managed to complete your project! Thank you for the comment and I have been very busy as you can see, mainly posting on instagram @zestandlavender I should start blogging again!
Emma
12th November 2020Do you finish and seal the paint with a clear varnish? If so, what do you use? If not, is there a reason? I’m debating whether to seal mine?
ilaria
15th November 2020Dear Emma, I didn’t use any varnish for my advent calendar. I wanted to maintain the natural look of the paints. However, if you wish to varnish yours I would suggest a clear varnish and not the glossy one. Hope this helps!